Edit: November 22, 2018
So you got a Korg nanoKontrol2 MIDI controller and you want to hook up to Max(MSP). I’ve made a simple patch to you get started connecting your controller to Max, where you can configure the individual toggle/momentary action, and is OSC-capable. The link is below.
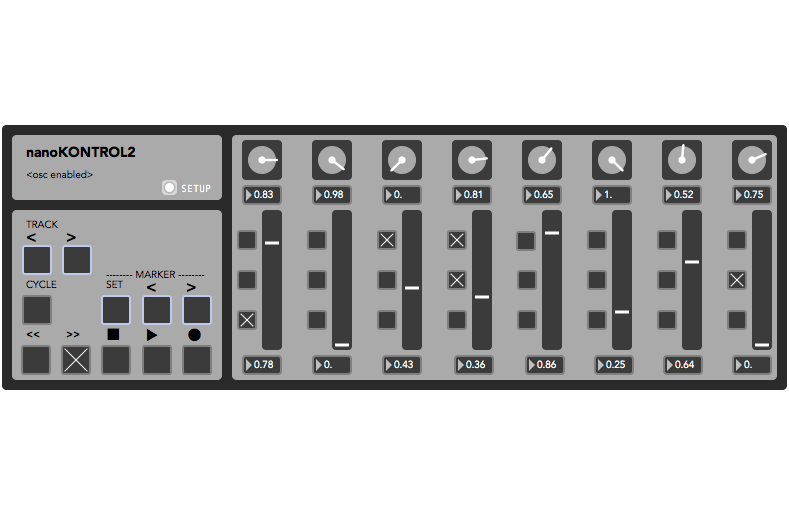
Of course, the first thing I did was a make a patch in MaxMSP for me to use with my other patches and is OSC capable. The MaxMSP patch models the layout of the nanoKontrol, responds with button LEDs, toggle/momentary interchangeable. While this patch is not a replacement for this tool, a corresponding on-screen visual will help in performance, and the use of OSC will extend its original capabilities. While I say this patch is not a replacement, all the UI elements are able to be manipulated in Max and will output MIDI and OSC to other devices.
Download:
[ zip file link ]
Contents: Kong Kontroller.maxpat (main patch), nanoKontrolButton.maxpat, nanoKontrolDialSlider.maxpat (abstractions).
** You don’t need to change the abstractions, just put them in the Max file path.
Notes
- The Setup window allows for MIDI device selection, button reset, button action change (momentary/toggle), and OSC/UDP routing.
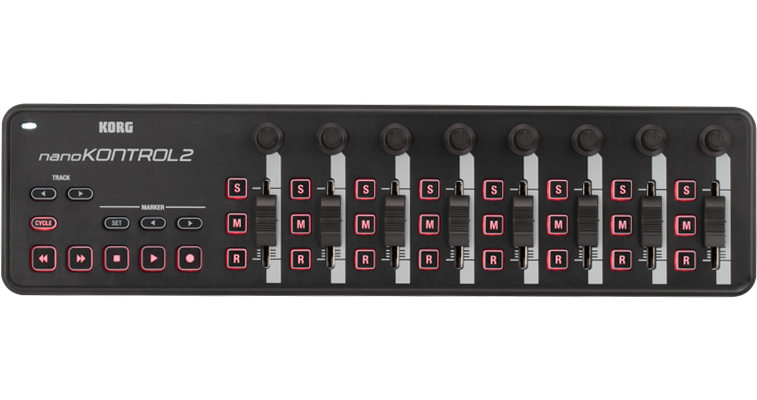
- A few buttons on the nanoKontrol2 do not have LEDs behind them (refer to above images). On the MaxMSP, these buttons have a light-blue outline.
- All OSC values are normalized [0.-1.] and MIDI values remain 0-127.
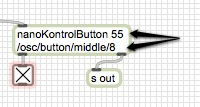
- I used Abstraction style patching, so arguments are used to customize the OSC and MIDI routing. See images below.
- For Sliders and Knobs, the first (and only) argument is the OSC-routing.
- For Buttons, the first argument is the MIDI CC# and the second argument is the OSC-routing.
There a few steps in order for the nanoKontrol2 to respond to the MaxMSP patch by lighting the appropriate LEDs.
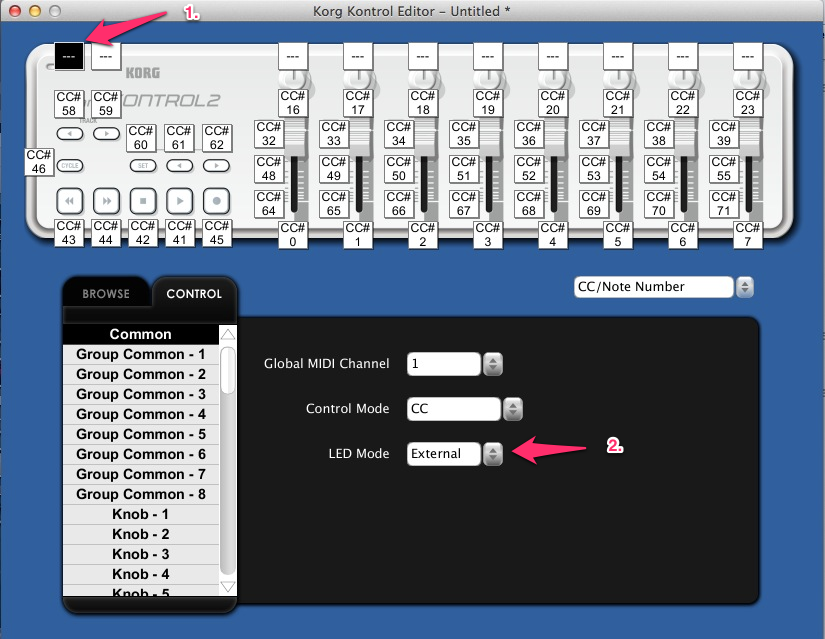
1. Download the Korg Kontrol Editor (https://www.korg.com/us/products/computergear/nanokontrol2/) — Scroll halfway down). While you’re at it, Korg recommends you download the USB-MIDI drivers as well– same page, Drivers tab.
2. From within the Kontrol Editor, click on the Common button (top left- see image) and then change the LED Mode to ‘External’.
3. You’re able to change the nanoKontrol2’s CC# and other values with the Kontrol Editor.
4. Remember to upload your new configuration to the device under the Menu item ‘Communication’ ->; ‘Write Scene Data’.
* External Mode allows other (external) programs like MaxMSP to control the button lighting. If you’re using the nanoKontrol2 for Live, Logic, DP, etc., you would probably keep it on ‘Internal’.
I used Avenir Book typeface for most of the UI. I’m not sure if it’s native for Mac. If not, is the link (http://fontzone.net/font-details/Avenir-Book/)
You can use, change, or completely change these patches.
Happy patching, and music making.
Now to tackle the AirTurn dual pedal system I also received.
